POLYDOME Installation & User Guide
Learn how to install, set up, and get the most out of POLYDOME in Blender 4 & 5.
 System Requirements
- Blender: 4.2+ (fully compatible with Blender 5)
- Render Engine: EEVEE and Cycles supported. Dome, floor, calibration, puddles and the Look controls work in both. Transparent mode, the Invisible Floor Reflection and the Backplate System need Cycles.
- HDRIs: Optimized for the Poly Haven Asset Browser, but works with any HDRI from the Asset Browser or your hard disk (.hdr and .exr, also png, jpg and tif).
- Internet: only needed to download other HDRI resolutions from Poly Haven.
- Operating System: Windows, macOS and Linux
 Download & Installation
Step 1 – Download: After purchase, download the polydome.zip file.
Step 2 – Install:
- Open Blender.
- Drag the polydome.zip file into the Blender window.
- Go to Edit → Preferences → Add-ons.
- Make sure that "PolyDome - The Ultimate HDRI Dome" is activated.
 Important: Do NOT unzip the file before installation. Blender installs the .zip directly
 After Installation
Watch the tutorial video for a full walkthrough of all features, controls, and the recommended workflow.
This tutorial covers setup, controls, floor matching, puddles, projections, and best practices. It was recorded on version 1.0, the Backplate System and Match Perspective of version 2.1 are explained in this guide.
 First Steps
- Check that PolyDome is enabled in Edit → Preferences → Add-ons.
- Press N in the 3D Viewport to open the Sidebar and switch to the PolyDome tab.
- Click the On/Off switch at the top of the panel. PolyDome creates the dome in your scene, and if your world already uses an HDRI, the dome takes it over.
- Load an HDRI: click Load HDRI, drag an .hdr or .exr file from your file explorer into the viewport, or drag a World from the Asset Browser into the scene.
- Set the viewport to Rendered to see the dome, the floor and the shadows as they will render.
Every scene has its own dome: settings are stored per scene, and every value in the panel can be keyframed.
 Panel Overview
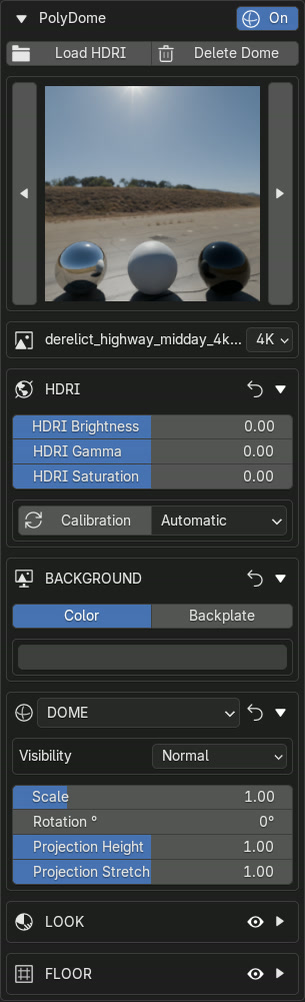
Where to find the panel
- 3D Viewport Sidebar: press N and open the PolyDome tab.
- World Properties: the same panel can be shown in the Properties editor, World tab.
- Location and tab name are set in Preferences → Add-ons → PolyDome → Panel Location.
The top of the panel
| On / Off | Switches PolyDome on for this scene and creates the dome. Off removes the dome from the view layer and switches a backplate off. Click the PolyDome title to collapse the panel. |
| Load HDRI | Opens a file browser for .hdr, .exr, png, jpg and tif files. Loading also switches PolyDome on. |
| Delete Dome | Removes the dome after a confirmation. The world goes back to a plain HDRI world with the same HDRI and rotation. Your own objects inside the PolyDome collection are moved to the scene collection, never deleted. |
The panel is built from five sections: HDRI, Background, Dome, Look and Floor. The buttons in the section headers:
  |
Fold | Opens and folds the section. |
 |
Reset | Puts only this section back to its defaults. |
 |
On / Off | Look and Floor: switches the whole section on and off, your settings are kept. |
 Loading & Browsing HDRIs
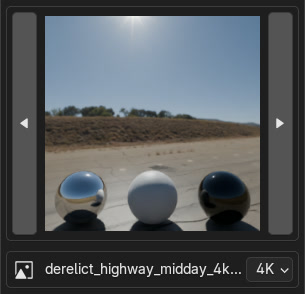
The live preview
The large thumbnail is a real background render of the dome and a set of preview spheres, lit by the current HDRI. It updates while you change settings and only renders while the panel is visible.
  Arrows |
Steps to the previous or next HDRI. If the current world comes from the Asset Browser, the arrows walk through the World assets selected in an open Asset Browser. Otherwise they walk through the other .hdr and .exr files in the same folder. Resolution variants such as name_2k and name_4k count as one HDRI. |
| HDRI name | The file in use, "No HDRI" before one is loaded. |
| Resolution | Switches between resolutions of the same HDRI. A checkmark means the file is already on disk, a download icon means PolyDome can download it from Poly Haven. |
Browse a whole collection: select a handful of HDRIs in the Asset Browser, then click through them with the arrows. That is the fastest way to compare lighting on your own scene.
Three ways to load an HDRI
- Load HDRI in the panel.
- Drag & drop an .hdr or .exr file from your file explorer into the 3D Viewport. PolyDome replaces the image empty Blender would normally create with the new dome HDRI.
- Asset Browser: drag a World asset, for example from the Poly Haven Asset Browser, into the scene. PolyDome takes over its HDRI.
Downloading other resolutions
HDRIs from the Poly Haven Asset Browser list every resolution Poly Haven offers. Pick one with a download icon and PolyDome downloads it in the background, with a progress bar and an X to cancel. The finished file is loaded automatically.
Work with a 2K or 4K HDRI while setting up, then switch to 8K or more for the final render. Files you downloaded once stay on disk and show a checkmark.
 HDRI & Floor Calibration
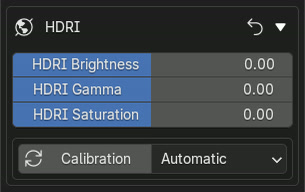
| HDRI Brightness | Brightness of the HDRI lighting and the dome. |
| HDRI Gamma | Contrast of the HDRI. |
| HDRI Saturation | Color strength of the HDRI. Pull it down for neutral, studio style light. |
 Calibration |
Measures the HDRI and sets a color compensation, so the floor blends seamlessly into the dome. Cycles and EEVEE get their own values. |
The dropdown next to Calibration sets when it runs:
| Automatic | The default. PolyDome recalibrates when a new HDRI is loaded and about a second and a half after you stop moving an HDRI slider. |
| Manual | Calibration only runs when you click the button. |
Red Calibration button: the HDRI sliders changed since the last calibration, so floor and dome may no longer match. Click the button, or switch to Automatic.
 Dome & Box Projection
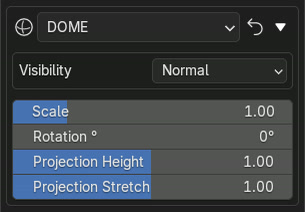
The dropdown in the section header picks the geometry the HDRI is projected on:
| DOME | A dome with a flat floor. The natural choice for outdoor HDRIs and open landscapes. |
| CUBE | Box Projection: the HDRI is projected onto a box. Better for interiors with flat floors and walls. |
| Scale | Size of the dome. The scale is exponential: 1 is the normal size, 2 is ten times larger, 0 a tenth. |
| Rotation ° | Turns the dome, and with it the direction of the light. |
| Projection Height | Moves the floor projection up and down, so the horizon and the floor line up with your scene. |
| Projection Stretch | Stretches the floor projection, for HDRIs where the ground looks too near or too far. |
Box Projection settings
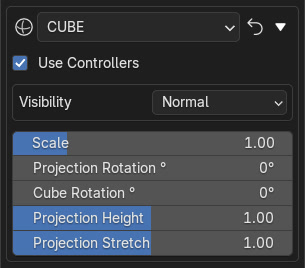
- Use Controllers: on by default. Six helper objects appear in the viewport, move them to place the walls of the box. They never render. Switch it off to type the walls in as numbers instead (X -, X +, Y -, Y +, Z -, Z +).
- Projection Rotation ° turns the HDRI on the box, Cube Rotation ° turns the box itself.
Match the room: in an interior HDRI, place the controllers on the real walls and the floor edge of the photo. The projection then lines up with the room, and objects sit on a floor that perspective-correctly continues the HDRI.
 Visibility & Invisible Mode
The Visibility dropdown in the Dome section decides what the camera sees of the dome:
| Normal | The dome is visible, the HDRI is your background. |
| Invisible | The dome is hidden from the camera but still lights the scene. Set the background with the color in the Background section. |
| Transparent | The dome becomes a shadow catcher and the film turns transparent: you get your objects with their shadows on an empty background, ready for compositing. Needs Cycles and a viewport in Rendered mode. |
- Invisible Floor Reflection (Floor section) adds a simple reflection under your objects while the floor itself is hidden. Cycles and a Rendered viewport only.
- Invisible and Transparent cannot be on at the same time.
If the camera or the viewport leaves the dome in Transparent mode, the view turns red with CAMERA OUTSIDE DOME or VIEW OUTSIDE DOME. The shadow catcher may cut off objects then. Move inside the dome or increase its Scale.
 Floor Shading & Puddles
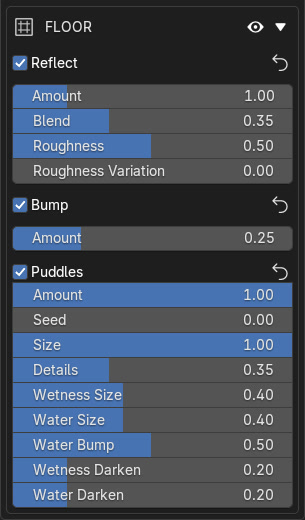
The Floor section shades the ground of the dome so it reacts to your scene like a real surface. The eye icon in the header switches the whole floor system on and off.
| Reflect | Floor reflections. Amount sets the strength, Blend how much of it mixes in, Roughness and Roughness Variation how sharp and how even it is. |
| Bump | Surface detail taken from the HDRI floor, so reflections break up like on real ground. Amount sets the strength. |
| Puddles | Procedural water puddles. Off by default. |
Puddle controls
| Seed | A new random puddle pattern. |
| Size / Details | Overall size of the puddles and how much fine detail their edges get. |
| Wetness Size / Water Size | Size of the wet, darkened ground around the puddles and of the standing water itself. |
| Water Bump | Ripples on the water surface. |
| Wetness Darken / Water Darken | How much darker the wet ground and the water get. |
Puddles are not available in Transparent mode and with a backplate, the section is greyed out then.
Look: Colors & Effects
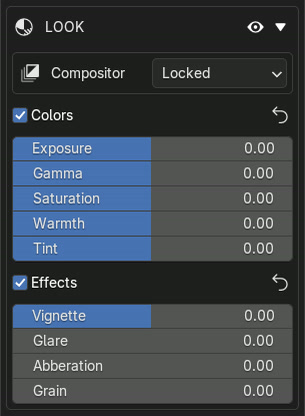
The Look section is a small color grade and lens effects stack, built in the compositor. The eye icon in the header switches it on and off as a whole.
| Colors | Exposure, Gamma, Saturation, Warmth and Tint for the whole image. |
| Effects | Vignette, Glare, Abberation (chromatic aberration) and Grain. |
Compositing mode
PolyDome needs the compositor for the Look and for backplates. The Compositor dropdown at the top of the section (also in the Preferences) sets how far it takes over:
| Locked | The default. PolyDome manages and locks the compositor. Changes you make to the compositor nodes are rebuilt. |
| Custom Nodes | PolyDome integrates into your own compositor node tree, so you can add nodes and keep the PolyDome controls. |
| Off | PolyDome leaves the compositor alone. The Look controls and the backplate are not available. |
Own compositing: if you want to add your own compositor nodes, switch to Custom Nodes first. In Locked mode they would be replaced.
 Backplate System
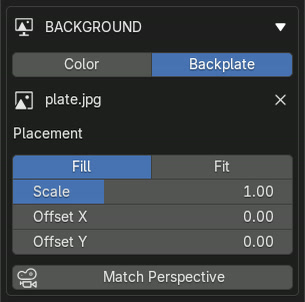
New in 2.1. A backplate is a photo behind your scene, while the HDRI keeps lighting it. Your objects cast their shadows onto the photo, so they sit in the image.
Setting up a backplate
- Load the HDRI that matches the photo, ideally shot at the same place.
- In the Background section, click Backplate, then Load Backplate and pick the photo.
- PolyDome switches to Cycles and a Rendered viewport. The dome becomes a transparent shadow catcher behind the plate.
 next to the image name removes the backplate again. Place the image with Fill (fills the frame and crops the edges) or Fit (shows the whole image), Scale and Offset X / Y.
- Click Match Perspective to line the camera up with the photo, see the next section.
 View Dome |
Hold the button to see the real dome instead of the plate, for example while you adjust Scale or Projection Height. Release to bring the plate back. The lock  next to it keeps the dome visible until you click it again. |
 Look link |
In the Look section a chain icon appears next to Colors and Effects. Linked, the plate gets the same grade as your render. Unlink it to grade the plate separately. |
Good to know: while a backplate is active, PolyDome sets the Color Management View Transform to Standard and applies your own view transform inside its compositing. Your original setting comes back when the backplate is switched off.
Backplates need Cycles and do not work while any viewport of the scene is in Material Preview, which always renders with EEVEE. Puddles are switched off with a backplate, and the floor bump is projected from the camera so it lines up with the photo.
Match Perspective
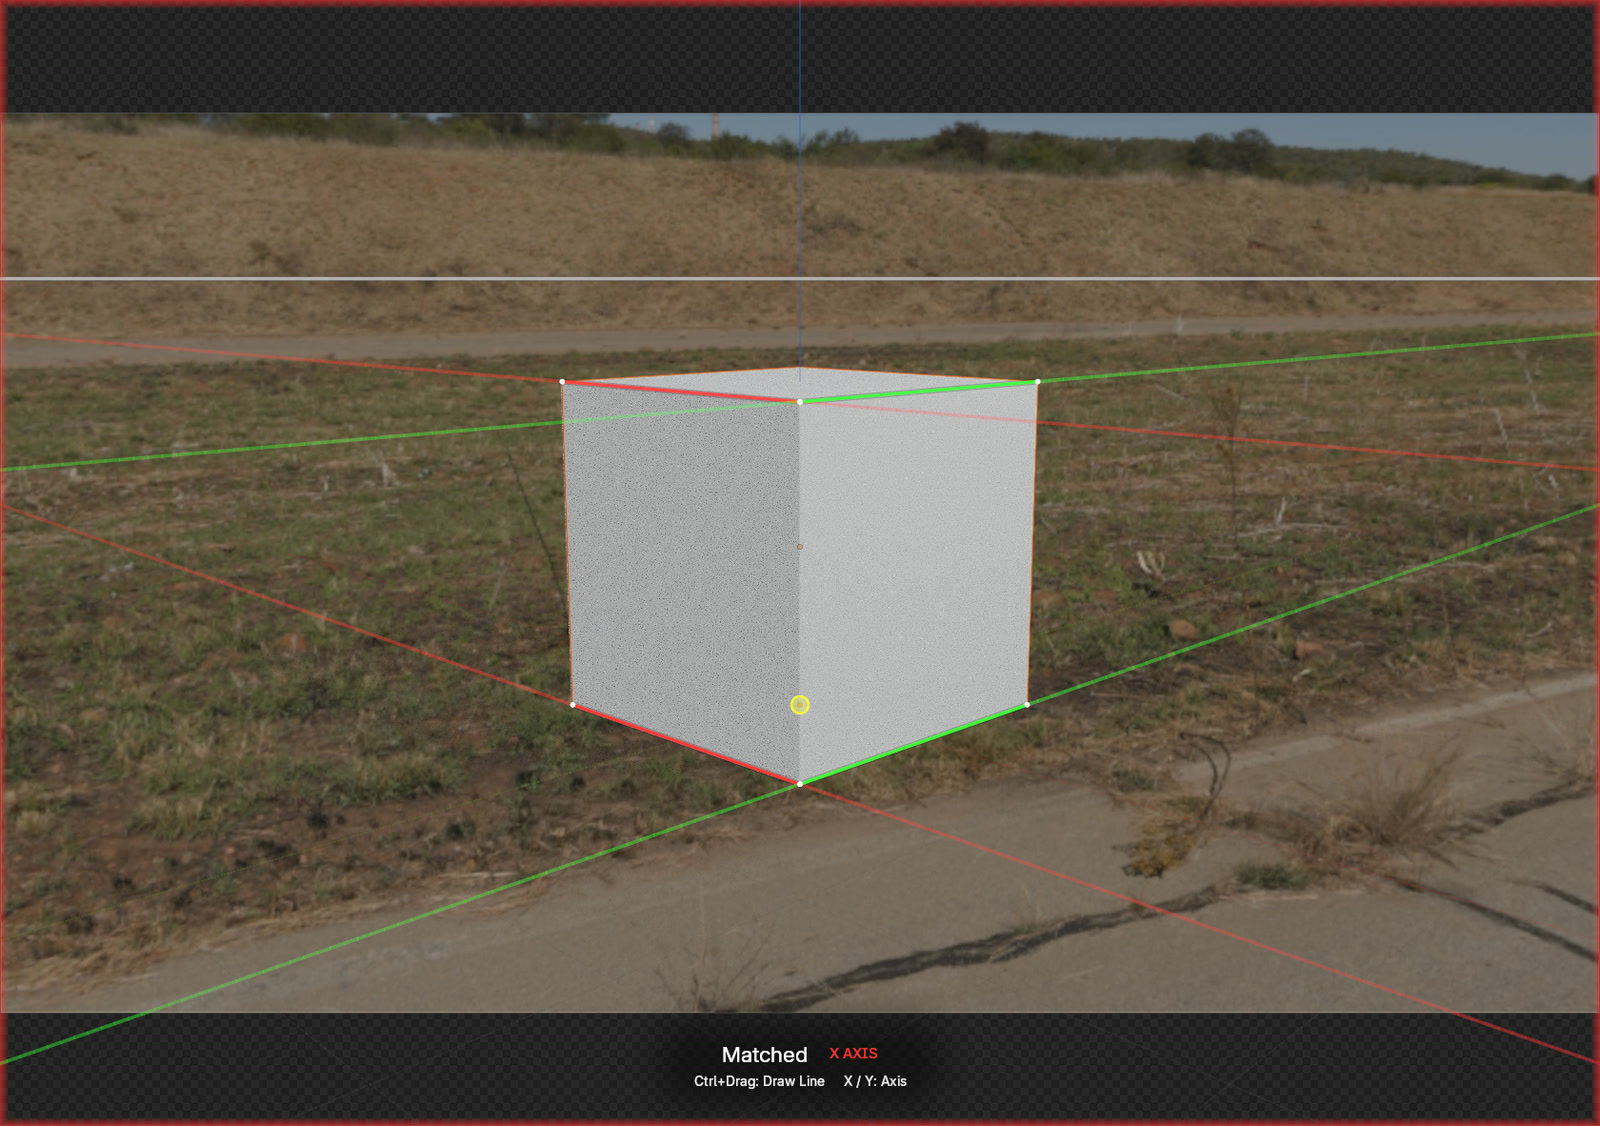
Match Perspective solves the camera from lines you place along edges in the photo: the edges of a street, a table or a floor tile. The colors show the axis: red X, green Y, blue Z.
Step by step
- Look through the camera you want to match. Without one, PolyDome creates PolyDome_Camera from the current view and sets the render resolution to the viewport size.
- Click Match Perspective in the Background section. The plate is shown as an overlay and two X and two Y lines are placed for you.
- Drag the line ends onto edges in the photo that run in the same direction: two lines along one direction for X, two along the other for Y.
- As soon as the lines give a solution, the status changes from No solution yet to Matched and the floor grid appears.
- Drag the ground origin handle to the spot in the photo where the center of the dome should sit.
- Click Apply to keep the camera, or Cancel to put it back as it was.
Set the resolution first: give the render resolution the aspect ratio of your photo before you start matching, and look through a camera. The match is more reliable and the plate is not cropped.
Mouse and keys
| Left drag on a line end | Moves that end. |
| Left drag on a line | Moves the whole line, it keeps pointing at its vanishing point. |
| Ctrl + Left drag | Draws a new line on the active axis. |
| X Y Z | Selects the active axis. Z needs Z Lines switched on. |
| Shift while dragging | Fine movement at a tenth of the speed. |
| Ctrl while dragging | Snaps to other line ends and to the origin. |
| Del | Removes the selected line. Every axis keeps at least two lines. |
| Esc or Ctrl + Z | Cancels matching and restores the camera. |
The Perspective box
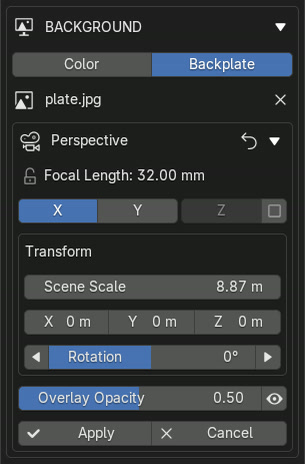
| Focal Length |
Shows the solved focal length. Lock it to keep a known value fixed while solving, for example from the EXIF data of the photo. |
| X / Y / Z, Z Lines | The active axis. Z Lines adds two vertical lines, for photos with strong vertical perspective. |
| Transform | Scene Scale sets the size of the matched scene, X / Y / Z move the solved camera, Rotation turns it around the origin, the arrows in 90 degree steps. |
| Overlay Opacity | How strongly the plate is shown over the viewport. Hold the eye icon to hide it for a moment. |
| Apply / Cancel | Keep the solved camera, or discard the match. |
Lines and settings are stored per camera and backplate. Running Match Perspective again on the same camera and photo brings your lines back.
Shortcuts
PolyDome can adjust the dome with mouse drags directly in the viewport. All three shortcuts are off by default. Switch them on in Preferences → Add-ons → PolyDome → Shortcuts.
| Rotate Dome | Alt + Middle mouse drag | Horizontal movement turns the dome. In CUBE mode it turns the box. |
| Projection Height | Alt + Shift + Middle mouse drag | Vertical movement moves the floor projection. |
| Projection Stretch | Alt + Ctrl + Middle mouse drag | Vertical movement stretches the floor projection. |
Release the button or click to confirm, Esc or Right click cancels. Every shortcut can get its own mouse button, modifier keys and sensitivity. The same actions can also be found with F3: Rotate Dome, Adjust Projection Height and Adjust Projection Stretch.
Several Scenes
- Every scene gets its own dome with its own settings.
- A scene made with Linked Copy shares the dome with the original. The panel then shows Dome shared with: and the scene names. Click Make Independent to give the scene its own dome.
- Delete Dome in a shared scene only removes the dome from this scene.
Preferences
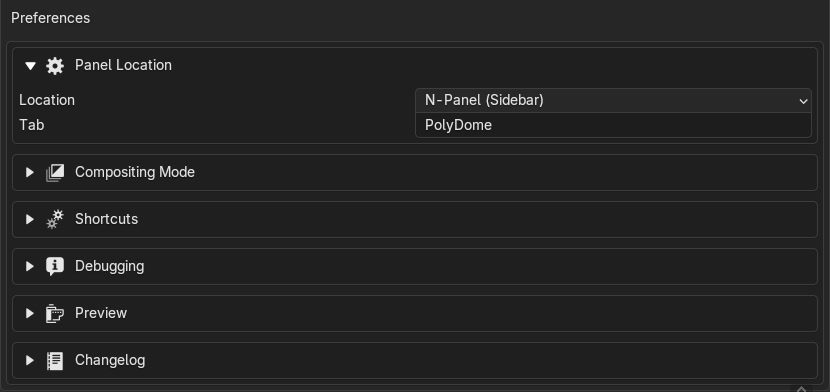
| Panel Location | Sidebar, World Properties or both, and the name of the sidebar tab. |
| Compositing Mode | Locked, Custom Nodes or Off, see Look. This setting applies to all files. |
| Shortcuts | The three dome shortcuts, see above. |
| Debugging | Log level, and Disable SSL Validation for networks where HDRI downloads fail because of certificates. |
| Preview | Engine of the panel preview (Cycles or EEVEE), device and GPU backend, Full-Resolution HDRI, Match Scene Samples, Warm Up Kernels on Enable and Restart Preview. |
| Changelog | Opens the changelog. |
 Tips & Best Practices
- Use EEVEE for fast previews, then switch to Cycles for the final render.
- The Poly Haven Asset Browser gives you built-in resolution switches, but any HDRI works just fine.
- Select a few HDRIs in the Asset Browser and click through them with the preview arrows to find the right lighting quickly.
- Keep Calibration on Automatic while you adjust the HDRI sliders, so the floor always matches the dome.
- Use Box Projection for scenes with flat indoor floors and Dome Projection for outdoor environments.
- Adjust puddle settings to instantly add realism to outdoor scenes.
- In Invisible Mode, set a custom background color or add a vignette effect to improve composition.
- With a backplate, set the render resolution to the aspect ratio of the photo before you run Match Perspective.
- Desaturate the HDRI for a clean studio look without changing the light direction.
 Troubleshooting
-
PolyDome Tab Not Visible After Install?
Open Edit → Preferences → Add-ons, search for "PolyDome" and ensure the checkbox is enabled. Check Panel Location in the add-on preferences: the panel may be set to World Properties only, or to another sidebar tab. -
Drag & Drop Doesn't Update the Dome?
Make sure PolyDome is switched on. Only .hdr and .exr files are converted when dropped into the viewport. If it still does not update, switch PolyDome off and back on in the panel. -
Floor Doesn't Match the HDRI?
Click Calibration or set it to Automatic. If the projection itself looks wrong, try switching between Dome and Box Projection and adjust Projection Height and Stretch. Each mode calculates floor alignment differently and one will usually give a better match for your specific HDRI. -
Transparent Is Greyed Out or Switches Itself Off?
Transparent needs Cycles and a viewport in Rendered mode. When one of the two is missing, PolyDome switches Transparent off again. -
Backplate Shows "Requires Cycles"?
Switch the render engine to Cycles and make sure no viewport of the scene is in Material Preview. Material Preview always uses EEVEE. -
Look Controls or Backplate Missing?
The compositing mode is set to Off, or the eye icon of the Look section is closed. Set the Compositor to Locked or Custom Nodes. -
My Own Compositor Nodes Disappear?
In Locked mode PolyDome rebuilds the compositor. Switch the compositing mode to Custom Nodes to keep your own nodes. -
Puddles Are Greyed Out?
Puddles are not available in Transparent mode and with a backplate. -
Color Management Shows "Standard" With a Backplate?
That is intended. PolyDome applies your own view transform inside its compositing and restores your setting when the backplate is switched off. -
The View Turns Red With "Camera Outside Dome"?
The camera or the viewport is outside the dome in Transparent mode. Increase the dome Scale or move the camera inside. -
The Preview Shows "First run: compiling kernels…"?
Cycles compiles its GPU kernels once, which can take a minute or two. Keep Warm Up Kernels on Enable switched on in the preferences, so this happens in the background right after Blender starts. -
"Preview disconnected" or "Preview render failed"?
Click Reconnect or Restart Preview under the preview. If it keeps failing, set the Preview Engine to EEVEE or the Cycles Device to CPU in the preferences. -
HDRI Download Fails?
Check your internet connection. In networks with certificate problems, switch on Disable SSL Validation in Preferences → Debugging. -
The Preview Arrows Are Greyed Out?
There is nothing to switch to. Select several World assets in an open Asset Browser, or keep several HDRIs in the same folder.
 Updates & Support
Updates & bug fixes are free.
Need help? Reach out anytime.
Email Support- Free updates
- EEVEE &
- Cycles
- Asset Browser ready